Rows and columns
One of the most annoying tasks when building UI is to calculate the position of each component on the screen. cvui has a set of methods that abstract that process, so you don’t have to think about (x,y) coordinates. Instead you just create rows/columns and cvui will arrange components for you.
You create rows by using beginRow() and endRow(). Similarly you create columns by using beginColumn() and endColumn(). The signature of cvui::begin*() is:
void begin{Row,Column} (
  cv::Mat &theWhere,
  int theX,
  int theY,
  int theWidth = -1,
  int theHeight = -1,
  int thePadding = 0
)
Both cvui::beginRow() and cvui::beginColumn() require you to inform the frame where the row/column will be rendered and its (x, y) coordinate on the screen. Opitionally you can inform the width, height and padding of the row/column.
cvui::beginRow() and cvui::beginColumn(), you inform (x,y) coordinates of the row/column itself, not the coordinates of its compoments.Create rows and columns
You can create a row/column in three steps: use begin*() to start a group (row or column), add components, then finish the group by calling end*(). In a row, all added elements are horizontally placed, one next the other (from left to right). In a column, all added elements are vertically placed, one below the other, from top to bottom.
Here is an example of a row:
cv::Mat frame = cv::Mat(300, 800, CV_8UC3);

// beginRow(cv::Mat, x, y)
cvui::beginRow(frame, 10, 20);
  cvui::text("This is another row");
  cvui::checkbox("checkbox", &checked);
  cvui::window(80, 80, "window");
  cvui::button(100, 30, "Fixed");
  cvui::text("with text.");
cvui::endRow();
The code above will produce the following on the screen:
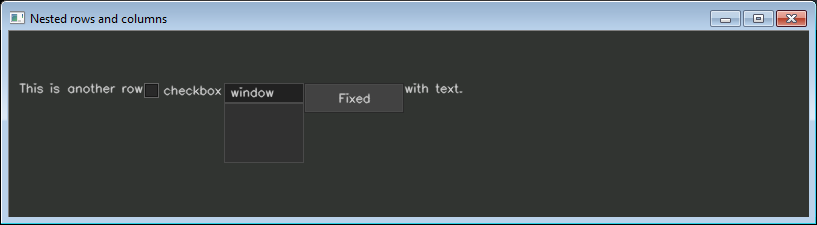
Figure 1: row with several components automatically placed by cvui.
In the example above, the row will be rendered to frame at coordinates (10, 20). Notice that all component calls between beginRow() and endRow() do not specify (x, y) coordinates, only width and height when needed, e.g. cvui::window(80, 80, "window") and cvui::button(100, 30, "Fixed").
Width, height, padding and spacing
Width and height of a row/column are -1 by default, which means cvui will calculate it based on the components. If you specify a width or height for a row/column, it influences how adjacent components, e.g. another row or a button, will be rended nearby your row/column when it is nested (learn more about nested rows here).
Padding of a row/column is 0 by defalut, which means components will be placed with no spacing between them. The parameter thePadding allows you to change the spacing of components in a row/column. Below is another row as example, however using 50 as padding:
// beginRow(cv::Mat, x, y, width, height, padding)
cvui::beginRow(frame, 10, 20, -1, -1, 50);
  cvui::text("This is another row");
  cvui::checkbox("checkbox", &checked);
  cvui::window(80, 80, "window");
  cvui::button(100, 30, "Fixed");
  cvui::text("with text.");
cvui::endRow();
The result on the screen will be:
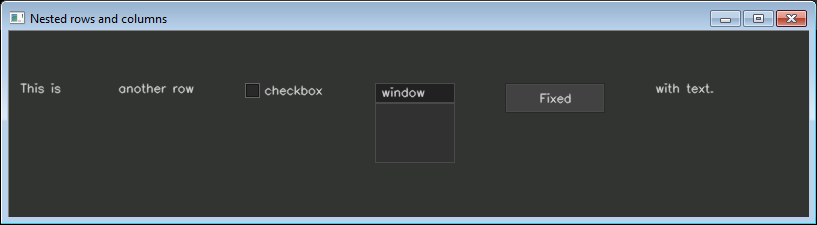
Figure 2: row with several components, spaced using a padding of 50 pixels.
You can create columns in the same fashion. Below is an example showing how to create three adjacent columns, which use different padding configurations.
// cv::Mat, x, y, width, height, padding
cvui::beginColumn(frame, 50, 50, 100, 200);
  cvui::text("Column 1 (no padding)");
  cvui::button("button1");
  cvui::button("button2");
  cvui::text("End of column 1");
cvui::endColumn();

// cv::Mat, x, y, width, height, padding
cvui::beginColumn(frame, 300, 50, 100, 200, 10);
  cvui::text("Column 2 (padding = 10)");
  cvui::button("button1");
  cvui::button("button2");
  cvui::trackbar(150, &value3, 0., 5.);
  cvui::text("End of column 2");
cvui::endColumn();

// cv::Mat, x, y, width, height, padding
cvui::beginColumn(frame, 550, 50, 100, 200);
  cvui::text("Column 3 (use space)");
  cvui::space(5);                       // Add 5 pixels of (vertical) space.
  cvui::button("button1 5px below");
  cvui::space(50);                      // Add 50 pixels of (vertical) space.
  cvui::text("Text 50px below");
  cvui::space(20);                      // Add 20 pixels of (vertical) space.
  cvui::button("Button 20px below");
  cvui::space(40);                      // Add 40 pixels of (vertical) space.
  cvui::text("End of column 2 (40px below)");
cvui::endColumn();
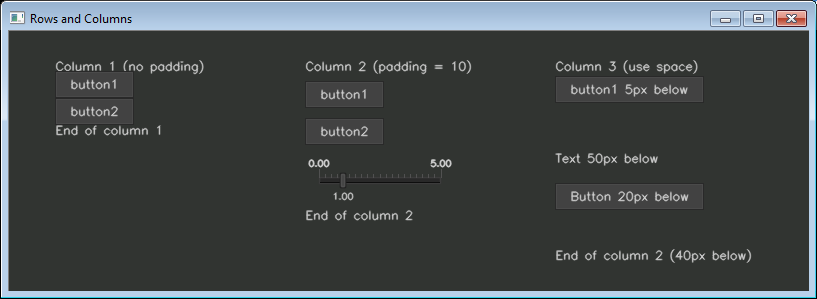
Figure 3: columns with different spacing configurations. Column #1: no padding. Column #2: padding of 10px. Column #3: no padding, but spaced using cvui::space().
You can also add an arbitrary amount of space between components by calling cvui::space(). Column 3 in the example above uses cvui::space() to customize the space between some components.
cvui::space() is context aware, so if it is used between beginColumn()/endColumn(), space will be vertical. If it is used between beginRow()/endRow(), space will be horizontal.Learn more
Check out the row-column example for more information about rows and columns. Continue to the Nesting section to learn how to nest rows and columns.